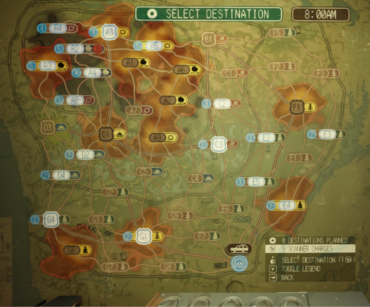
A Junction is one of the destinations the player can either scan using one of the Scanning Antenna's Scanner Charges while looking at the Route Planner, or drive through on their way to their desired destination.
When entering a Junction, the game will be saved. While in a Junction, leaving the game and rejoining will put you at the point where you entered said Junction.
The playable area of a Junction is surrounded by a multi-colored shimmering field. Attempting to leave the playable area, whether by car or on foot, will lead to the shimmer quickly intensifying until you're warped back within the boundaries. The warp is harmless, apart from minor damage to the car if you're driving at the time.
Junction Summary
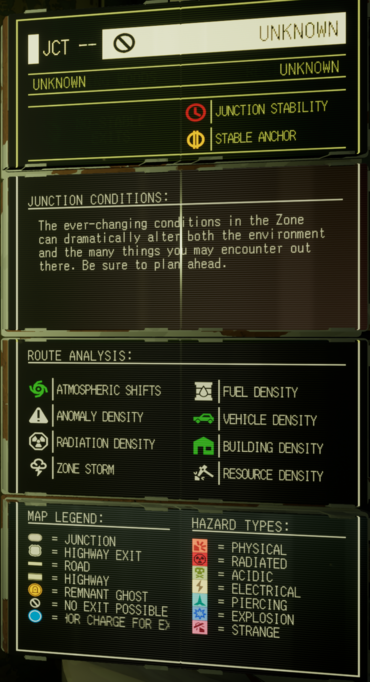
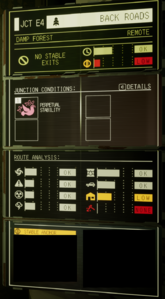
The image below shows a summary of the Junction, its conditions, potential hazards and their expected frequency, as well as buildings or vehicles and their loot density.
All properties below the two horizontal lines in the Summary view are procedurally generated.
Junction Identifier
Every Junction has an identifier given to it, that is one letter and one number, such as E5, with letters ranging from A to G and R. These are similar, but not the same, to grid coordinates on maps, as the Letter is based off of the junctions position on the map in "sectors" and the number is simply used to uniquely identify the junction in that sector. For example, the player starts in The Auto Shop at E8, can move northwest to G1 then northwest again to G3, or northeast to F1 and northeast again to F3.
Biome
Every Junction has a biome that determines what the area looks like, the Anomalies that appear, and the possible resources the player might find. The biome for a Junction can be determined by the Junction's map icon, as well as the biome icon that appears next to the Junction Identifier in the Summary view. The biome is also spelled out in the label just below the Junction Identifier in the Summary view.
Junction Name
In the Upper Right corner of the Summary view is the Junction's Name. Some of these are notable and story-related, such as Sierram, others are flavor but provide a hint to the type of map the player may encounter. These names can be shared with other Junctions, as they have similar (or the same) map layout.
Conditions
Each Junction has up to four conditions that are randomly generated. These modifiers affect how difficult a Junction is, though some may make them easier (ex. Perpetual Stability).
Route Analysis
Every Junction has randomly generated tiers of certain elements that appear in the Route Analysis of the Junction Summary. These tiers can vary from "NONE" or "MAX". The analyzed elements are:
- Atmospheric Shifts
- Anomaly Density
- Radiation Density
- Zone Storm
- Fuel Density
- Vehicle Density
- Building Density
- Resource Density
The desirable elements are Fuel, Vehicle, Building, and Resource Density as these control the amount of vehicles and buildings you'll find, as well as the amount of resources. Note, even if Resource Density is NONE, this doesn't mean there are no resources anywhere in the Junction.
Hazards and Lootables
The final section of the Summary view shows the Anchors, Anomalies, and Lootables that The Driver may find in the Junction.
Exit Junctions
These Junctions have Stable Exits and can be used to complete a Run. The amount of kLIM's necessary to open a Gateway is shown in one of several places:
- their tooltip on the Route Planner's map
- in the Junction Summary, viewable in the Route Planner when hovering over the Junction
- on the Traveling screen when choosing the next Junctiono
- upon entering a Junction
- when viewing the ARC Device in the car
Typically, Exit Junctions are those that appear at the outer edge of how far you've explored and unlock new Junctions after exiting through a gateway. They can appear as Intermediate Junctions as well.
Intermediate Junctions
Early in the game, the player will start to unlock Junctions that require driving through other Junctions to reach them. These Intermediate Junctions are chained together to make a Run. Intermediate Junctions can also be Exit Junctions that the player can choose to open a Gateway in and end their run there, or they can choose to continue through a toward their destination.
Non-Exit Junctions
Some Junctions do not have any Stable Exits and cannot be used to complete a Run. These are "Intermediate Junctions" and show "NO STABLE EXITS" in the space where an Exit Junction shows the kLIMs required to open a Gateway.
-
Junction Summary, viewed in the Route Planner, for a simple, early game, Non-Exit Junction the player is likely to encounter. The Anomalies have been redacted to prevent spoilers.
Dead Ends
If a Non-Exit Junction generates with no outgoing connections to viable Exit Junctions, it becomes a Dead End. Entering such a junction is tantamount to failure, as the only ways to return to the Auto Shop at that point are either abandoning the run, or dying. The current active save will have been overwritten at the moment of entering the junction, removing the ability to reload into the previous junction.
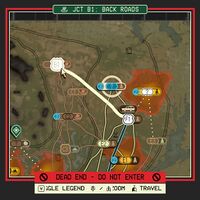
Since these effects are quite devastating, the game takes multiple steps to warn against entering a Dead End. In the Route Planner, they are marked as such in the kLIM readout and it's impossible to select one as a route destination. When travelling between junctions, hovering over a Dead End will display a more prominent warning around the map border, and attempting to travel to one will sound a warning chime, allowing some time to react and release the button before the animation completes. Finally, as a statement more than a warning, the ARC Device status becomes "DEAD END: ABANDON TRIP" once inside a Dead End junction.
There are no Achievements or User Manual entries unlocked by visiting a Dead End.
-
A Dead End junction in the Route Planner. Note that C1 is considered a Dead End even though it's connected to B1; this is because B1 itself is a Dead End.
-
A Dead End junction in the travel interface. This is your final warning.
-
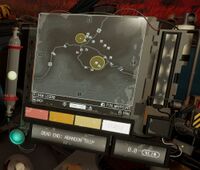
The ARC Device informs you that you cannot return by convencional means.
Highway Junctions
Highway junctions may work slightly differently to regular junctions depending on some factors. Travelling to a highway via a regular road will result in the junction working the same as any other however travelling to a highway junction via a highway road will have an additional junction added to the trip that is not visible on the map and is located halfway along the highway. These mid highway road junctions are usually more straightforward maps than the usual junction maps and contain minimal Structures.
If the Junction Bypass has been unlocked, the Driver is able to travel along highway roads without needing to stop at the main junctions and will travel along mid highway road junctions.
-
Highway Road
-
Regular Road
Junction Nodes
| Type | Identifier | Junction Name | Connections |
|---|---|---|---|
 Junction |
JCT A1 | N/A | JCT A2 JCT A6 JCT A7 JCT R2 |
 Junction |
JCT A2 | N/A | JCT A1 JCT A6 JCT A9 JCT C4 |
 Junction |
JCT A4 | Tourist Attraction | JCT A7 JCT A8 HWY D1 JCT R2 |
 Junction |
JCT A5 | N/A | HWY A3 JCT A6 HWY B1 JCT C1 |
 Junction |
JCT A6 | N/A | JCT A1 JCT A2 JCT A5 JCT C3 |
 Junction |
JCT A7 | N/A | JCT A1 JCT A4 HWY D1 JCT C5 |
 Junction |
JCT A8 | N/A | JCT A4 HWY D1 JCT R3 |
 Junction |
JCT A9 | Old Wall | JCT A2 JCT C4 JCT C5 |
 Junction |
JCT C1 | Red Meadow | JCT A5 HWY B1 JCT C2 JCT E2 JCT F2 |
 Junction |
JCT C2 | N/A | JCT A6 HWY B1 JCT C1 HWY C3 JCT C4 JCT E2 |
 Junction |
JCT C4 | N/A | JCT A2 JCT A9 JCT C2 JCT E6 JCT G9 |
 Junction |
JCT C5 | N/A | JCT A7 JCT A9 HWY D1 JCT D2 HWY G1 JCT G9 |
 Junction |
JCT D2 | N/A | JCT C5 HWY D1 HWY D3 JCT D4 JCT G2 JCT G3 HWY G4 |
 Junction |
JCT D4 | N/A | JCT D2 HWY D3 HWY G4 |
 Junction |
JCT E1 | Sierram | JCT E2 JCT E4 JCT E5 HWY F1 |
 Junction |
JCT E2 | The Downs | JCT C1 JCT C2 HWY C3 JCT E1 JCT E5 JCT E6 HWY F1 JCT F2 |
 Junction |
JCT E3 | N/A | JCT E4 JCT F3 |
 Junction |
JCT E4 | N/A | JCT E1 JCT E3 JCT E8 |
 Junction |
JCT E5 | N/A | JCT E1 JCT E2 JCT E8 |
 Junction |
JCT E6 | N/A | HWY C3 JCT C4 JCT E2 JCT E8 JCT G9 |
 Junction |
JCT E7 | N/A | JCT E8 HWY G1 JCT G9 |
 Home Junction |
JCT E8 | The Auto Shop | JCT E4 JCT E5 JCT E6 JCT E7 HWY F1 HWY G1 JCT G8 |
 Junction |
JCT F2 | N/A | HWY B1 JCT C1 JCT E2 HWY F1 JCT F3 |
 Junction |
JCT F3 | N/A | JCT E3 HWY F1 JCT F2 JCT F5 |
 Junction |
JCT F5 | N/A | HWY B1 JCT F3 |
 Junction |
JCT G2 | Expansion Wall | JCT D2 JCT G3 |
 Junction |
JCT G3 | N/A | JCT D2 HWY G1 JCT G2 JCT G7 |
 Junction |
JCT G6 | N/A | HWY G4 JCT G7 |
 Junction |
JCT G7 | N/A | JCT G3 JCT G6 JCT G8 |
 Junction |
JCT G8 | N/A | JCT E8 HWY G1 JCT G7 |
 Junction |
JCT G9 | N/A | JCT C4 JCT C5 JCT E6 JCT E7 HWY G1 |
 Junction |
JCT R2 | N/A | JCT A1 HWY A3 JCT A4 JCT A5 |
 Junction |
JCT R3 | N/A | JCT A8 HWY D3 |
 Junction |
JCT R4 | N/A | HWY A3 |

